- 下载地址:https://dev.mysql.com/get/Downloads/MySQL-5.7/mysql-5.7.21-linux-glibc2.12-x86_64.tar.gz
- 解压安装包到指定的目录,并指定MySQL的数据目录
tar -zxvf mysql-5.7.21-linux-glibc2.12-x86_64.tar.gz -C /data/server/
mkdir -p /data/server/$mysqlHome/data - 添加MySQL运行组与用户,并更改Mysql数据目录权限
useradd -s /sbin/nologin -M mysql
chow -R mysql:mysql /data/server/$mysqlHome/data - 初始化数据库
mysqld --initialize
报错:
./mysqld: error while loading shared libraries: libnuma.so.1: cannot open shared object file: No such file or directory
解决: 安装 numactl 包: yum -y install numactl
命令执行完成后输出如下:
#警告:时间设置问题
2018-03-21T09:00:27.893269Z 0 [Warning] TIMESTAMP with implicit DEFAULT value is deprecated. Please use --explicit_defaults_for_timestamp server option (see documentation for more details).
#错误:没有找到错误信息文件?
2018-03-21T09:00:27.893465Z 0 [ERROR] Can't find error-message file '/usr/local/mysql/share/errmsg.sys'. Check error-message file location and 'lc-messages-dir' configuration directive.
2018-03-21T09:00:29.057739Z 0 [Warning] InnoDB: New log files created, LSN=45790
2018-03-21T09:00:29.282836Z 0 [Warning] InnoDB: Creating foreign key constraint system tables.
2018-03-21T09:00:29.391339Z 0 [Warning] No existing UUID has been found, so we assume that this is the first time that this server has been started. Generating a new UUID: 4dc8eac9-2ce6-11e8-8c9c-525400c6f190.
2018-03-21T09:00:29.409063Z 0 [Warning] Gtid table is not ready to be used. Table 'mysql.gtid_executed' cannot be opened.
# 默认的密码,可在日志中查看到【注意是mysqld块的日志文件】,如果使用 --initialize-insecure 参数,则默认的密码是空的
2018-03-21T09:00:29.409805Z 1 [Note] A temporary password is generated for root@localhost: aaNP92>z?<jl - 使用指定的配置文件,按以上步骤后会在/etc/目录下生成 my.cnf文件与 my.cnf.d 目录,初始化的时候它会加载这里面的配置文件,修改为使用指定的配置文件【即:第6步】;参考配置文件: MySql配置文件
- 两次初始化命令:
/bin/mysqld --defaults-file=/data/server/mysql/my.cnf --user=mysql --initialize - 使用其自带的ini.t脚本来启动MySQL:
cp /data/server/mysql/support-files/mysql.server /etc/init.d/mysql5.7
vim /etc/init.d/mysql5.7 # 指定 basedir 与 datadir 的路径,其它不变
# 注意,看此文件中的一段说明,如图: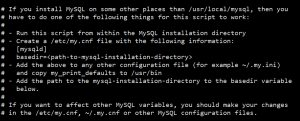
使用包中自带的脚本需要执行的前置步骤 前置步骤:
Copy /data/server/mysql/bin/my_print_defaults 到 /usr/bin 目录,其它的可以忽略 - 在启动中一直报错:
[root@VM_0_11_centos mysql]# ./mysql.server start
Starting MySQL.2018-03-21T10:24:15.337638Z mysqld_safe error: log-error set to '/data/server/mysql/logs/mysql5.7.log', however file don't exists. Create writable for user 'mysql'.
ERROR! The server quit without updating PID file (/data/server/mysql/data/VM_0_11_centos.pid).
解决: 注意查看目录的权限:需要744,如果已经为此权限,还是报错,则手动创建目录与文件,并修改用户与组 - 启动成功后,命令行链接问题,不能用IP+端口的形式访问:
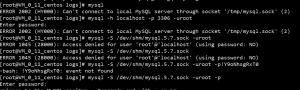
默认链接到了/tmp/mysql.sock 报错 解决:
1. 使用 -S 指定配置文件中的 sock 路径 来链接
2. 在此版本中,当使用 mysql -hlocalhost -p3306 -p 此方式来链接的时候,默认会使用Socket来链接,而不是我们认为的TCP/IP,如果要使用TCP/IP来链接,则需要把loalhost换成 127.0.0.1 ,最好还要添加一下登陆授权并刷新【即:grant all privileges on *.* to 'root'@'127.0.0.1' identified by "ysp" with grant option; flush privilieges;】授权如图:
默认只能通过localhost登陆,所以就只能进行Socket链接 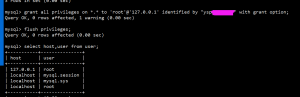
添加登陆授权之后 原因如下:
连接MySQL数据库有两种方式:TCP/IP(一般理解的端口的那种)和Unix套接字(一般叫socket或者sock)。大部分情况下,可以用localhost代表本机127.0.0.1,但是在MySQL连接时,二者不可混用,而且MySQL中权限设置中localhost与127.0.0.1也是分开设置的。当设置为127.0.0.1时,系统通过TCP/IP方式连接数据库;当设置为localhost时,系统通过socket方式连接数据库。
- 第一次登陆成功,执行命令前需要修改密码

修改密码,才能执行下一步操作
**5.7之前版本**
解决: SET PASSWORD = PASSWORD('123456');
**5.7之后的版本**
解决:ALTER USER USER() IDENTIFIED BY 'Admin2022!';